
Blog 20 - Verisense Web Portal Explained
Blog 20 gives a brief, high level insight into the user interface of the Verisense web portal. The portal was designed specially to allow for quick and easy deployment of wearable sensors in a clinical trial. We’ll briefly touch on:
the different options for configuring a trial, including how to configure the sensor settings and adding sites and participants to a trial.
the Verisense dashboard that allows trial managers near real time visibility on the performance of the participants and the equipment they have been assigned.
and explain how data collected can be retrieved from the portal.
User Roles
There are three different user roles that can be assigned to persons involved to meet and safeguard different compliance needs in the trial:
1. Operator
The operator has complete access and functionality across all elements of the system. They can alter the configuration settings, add participants, sites and users, view the dashboard and retrieve all data on the system. They can also access the Verisense mobile app, and pair sensors and participants if required.
2. Site Admin
The site admin has limited access to the web portal. They can view the dashboard, but only the site or sites they are assigned to will be visible. The site admin has one permission in the configuration settings and that allows them to add participants to the portal. The site admin does have full access to the Verisense mobile app to facilitate the pairing of sensors and participants. The site admin cannot retrieve any data files.
3. Analyst
The Analyst’s primary role is to be able to retrieve data from all sites in the trial. The analyst can view the dashboard for all sites in the trial. The analyst has no access to any configuration settings, nor can they access the Verisense mobile app.
Configuration – Operator role only
The configuration settings can only be accessed by the Operator, with the one exception of the Participants tab, which can be available to site administrators should the operator allow.
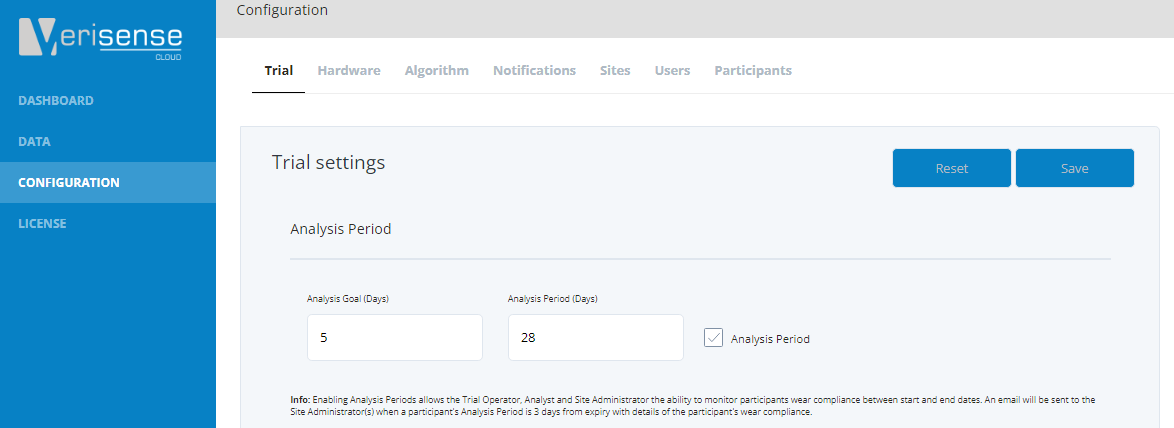
Trial - Trial Settings - Analysis Period
Analysis periods are a tool to monitor wear compliance over a certain period. An example of this might be if the trial protocol asks for 5 days of wear between sites visits, which in this example are every 4 weeks (28 days). If the Analysis period checkbox is checked the operator or site admin can setup and monitor analysis periods for participants at the site level – we will explain how later on.
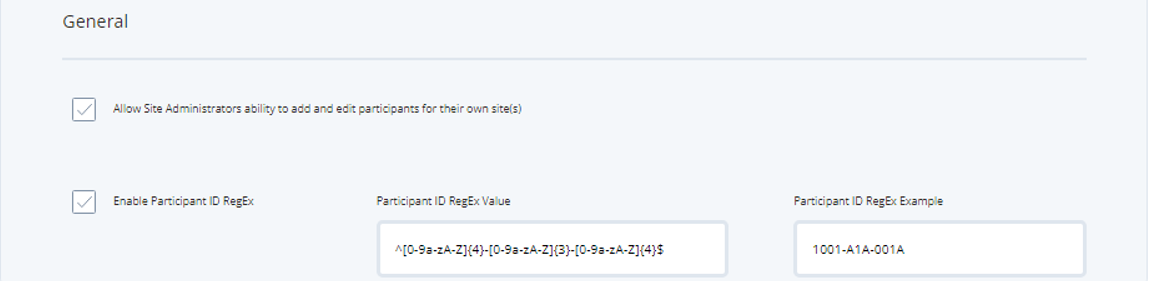
Trial - Trial Settings - General Settings
If the first checkbox in general settings is ticked, it means the site admin has the ability to add and edit participants for their assigned sites.
By default participants IDs can be any combination of numbers and/or text characters. By clicking the Enable Participant ID RegEx checkbox, the operator can define a set combination that must be met when adding participants. In this example, the ID must match a combination of letters or numbers with 4 characters followed by a dash, 3 characters followed by a dash, and 4 characters to finish. This adds an extra layer of security to ensure participants IDs are inputted correctly.
Hardware - Sensor Settings
Under sensor settings you can enable and change the setting for each particular sensor on the device. Where a checkbox is enabled that sensor is set to collect data. These settings are usually agreed upon and set by the Shimmer team before a trial begins and generally should be not be altered during a the course of a trial.
If your trial is using the Verisense IMU, you will be able to alter the sampling rate and sensor range for both the accelerometer and gyroscope.

If your trial is using the Verisense Pulse+ sensor you can alter the accelerometer sampling rate and range.
The sampling rate for the PPG on the Pulse+ sensor can also be changed. As measuring PPG has an impact on battery life there are some options available for managing this. Recording duration can be set to always ON, so continuously collecting data. However, if prolonging battery life is a priority, the recording duration can be set to 1 minute, 2 minutes or 5 minutes, to correspond with this the recording interval can set for 15 minutes, 1 hours, 3 hours, 6 hours, 12 hours or 1 day (24 hours). In a case where you want to measure PPG for 5 minutes over a 24 hour period you would set recording duration to 5 minutes and the interval to 1 day. Another example could be that you want to record 2 minutes of PPG every 15 minutes. In whatever configuration is desired and setup the PPG sensor will collect that amount of data only. As you can see there is flexibility available to record PPG data as desired in line with how long you require the battery to perform on a single charge.
For GSR the sampling rate can be set from 5Hz to 50Hz.

Battery type will need to correspond depending on whether you are using disposable (non rechargeable battery) or the rechargeable batteries. Firmware version will generally correspond to the latest version available and only in certain circumstance agreed with Shimmer should this be changed.
Having the Enable adaptive scheduler checkbox enabled will ask the Verisense system to find the best time to perform the upload should the default upload times not be best suited for connecting. This will generally correspond to the time of the day that the Base Station and Sensor are in close proximity most often.

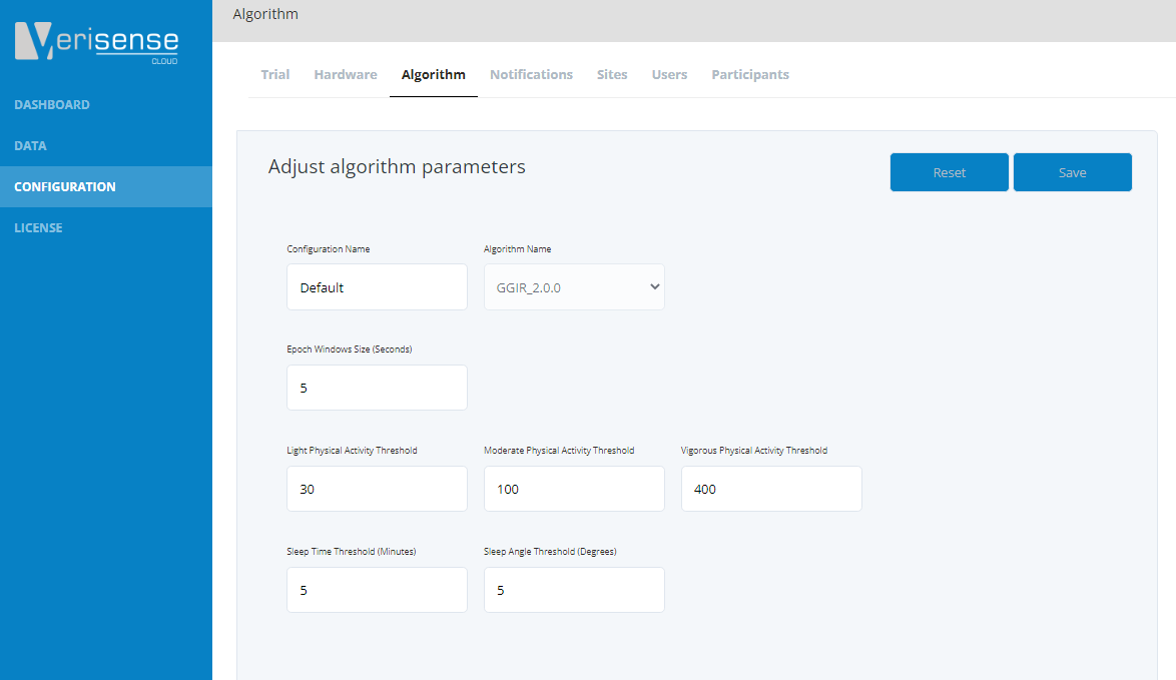
Algorithm
The algorithm window will display all available algorithms that can be applied to the raw data. There is also the capability to change some algorithm settings, however the default settings should only be changed upon consultation with Shimmer’s data science team.
Notifications
The notifications window is where the operator can decide on whether to enable email alerts for the site administrators and also set the thresholds that determine if an error or warning about the system health status is triggered.
As you’ll see in the email send options box there are three options
“Always send” will send the site admins a daily email with an update on the site or sites they are assigned to, and the participants within those sites
“Only send if status is not OK” will just send an email to the site admin if an error or warning is present for a site they are assigned to
“Never send” will ensure no email alerts are ever sent to the site administrator

Here is an example of the email that is send to the site administrator.

The operators can set the thresholds that determine if an error or warning about the system components is triggered. The toggles can be dragged forward or back to set the preferred thresholds.
Sensor Power – This relates to the battery remaining on the sensor
Base Station Power - This relates to the battery remaining on the Base Station, Android phone with the Verisense app installed
Sensor Connectivity – This relates to how many days the sensor has not communicated with the Base Station for
Base Station connectivity – This relates to how many days the Base Station has not connected with the AWS trial server for
Sensor Non-wear detection – This related to when an error should be generated if the system detects the participants is not wearing the sensor

Sites
This is where site location can be added, edited, and removed. The number of admins, Base Stations and Sensor currently assigned to that site are also visible. A site can only be removed or have the name edited when there are no Sensors or Base Stations currently assigned.

Users
The users tab is where persons assigned to the trial have their roles setup. As mentioned at the start there are 3 user types, Operator, Site Administrator and Analyst. Users in a trial cannot be deleted owing to traceability requirements, however they can be disabled in which case they will no longer have access to the system. The edit options also allows for details to be updated, and for site admin to be assigned or unassigned sites as required.


Participants
The participants tab is where participants of the study have their unique study identifier code added. This can be any combination of letters or numbers. Once participants have been added to the portal here, they are now ready to be entered into the trial by the site admin at the site level. Participants can only be removed or have their ID edited if they are not assigned to a Sensor and site. Participants can be disabled at this level, this will essentially send a message to the sensor to stop collecting data. They can also be re enabled as required.

Dashboard
All users have some level of access to the site dashboard. Operators and Analysts can view the dashboard for all sites and participants in the trial, while site administrators can only view the sites and participants they have been assigned to.
The Dashboard gives a quick preview of the status of Participants, Base Stations and the Analysis Period. The color codes indicate the present status.
Green indicates no warnings or errors exist in any Base Stations or Sensors assigned to the site
Orange indicates a warning exists, but no errors exists in either the Base Station or Sensor assigned to the site
Red indicates an error exists in a Base Station or Sensor assigned to the site
Blue indicates pending, further data is required to determine status of the Sensor

Selecting a Site will list all Participant/s assigned to that site. A quick preview of Participant/s with relevant info such as date latest data received, Sensor power, connectivity, non-wear and Base Station status is available.
A snapshot of the Analysis Goal Status if in use, and the Analysis Period Status. As detailed in the configuration trial settings, Analysis periods are a tool to monitor wear compliance over a certain period for a wrist worn based study.

Selecting a Participant within a site drills down further to provide additional details on the Sensor/s, Base Station and Administrators assigned to that participant.

At this point the site administrator or operator can setup a compliance analysis period. Analysis periods can also be edited or deleted, this feature may be helpful if the date of a site visit changes. Analysis Period Dashboard displays;
Start/End Date
Analysis Period Duration (days)
Number of Days with Data or that period -
Number of Days Worn for that period
Analysis Goal Current/Required (how many consecutive days of wear has been achieved v the required days as set by Trial Operator)
Analysis Period (Number of Days left to achieve Analysis Period Compliance or if period has ended)
As you can see the dashboard gives a near real time status of participants in the trial and allows for quick intervention should there be an issue with a sensor, base station or non wear compliance.
Data
The data tab is where the analyst or trial operator can download the complete raw data and/or aggregated activity and sleep metrics from participants. The user can select the Start/End Date for which date period they want to retrieve data for a participant.
A maximum of 1.5GB can be exported per participant at a time via the web portal. Larger files can be downloaded more quickly directly from the AWS trial server location.

Conclusion
We hope this brief insight into the Verisense web portal gives a sense for the ease at which a trial can be setup and the near real time ability to monitor participants and their compliance to the trial protocol. Should you be planning a trial incorporating wearables please contact us for a free consultation and we can give further details on how the Verisense platform can be integrated to suit your study requirements.